Why the classic lookbook page leaks sales
The lookbook started as print — a season’s styled photography bound for buyers and press — and most online versions still behave like print. A PDF, a static image gallery, an Instagram embed: they all show the look and then abandon the shopper at the exact moment of intent. To buy, the shopper has to leave the page, search for each item by memory, and re-decide on every product page. Each step loses people.
A shoppable lookbook closes that gap in place. Interactive hotspots sit on the products in each photo; a tap opens a popup with the live price, a variant picker and an add-to-cart button. The page keeps its editorial feel — and becomes a working storefront. For the outfit-selling specifics (one-tap looks, set discounts), see the Shop the Look guide; this page is about the lookbook page itself.
What a lookbook page needs to actually sell
- Live commerce on the photo — price, variants, stock state and add-to-cart in the popup, synced with your catalog. A caption with a hand-typed price goes stale by the first sale.
- A real mobile version — a separate phone crop per photo with its own hotspot positions, because most lookbook traffic is mobile and squeezed desktop shots put markers on the wrong products.
- Whole-look buying — the shopper who loves the photo shouldn’t assemble it item by item; one tap should add the outfit.
- Numbers behind it — revenue attributed to each image and hotspot, so next season’s shoot is planned from data instead of taste.
Build the lookbook page in six steps, no code
About half an hour from photos to a live page, on Dawn, Horizon or any Online Store 2.0 theme.
Add the page
Shopify admin → Online Store → Pages → Add page. Title it “Lookbook” (or the season’s name) and save — it starts empty, the gallery arrives in step 5.
Build the gallery
In Hotspot Studio create a section with the Grid or Masonry layout — or start from the Lookbook Grid template — and upload the season’s photos.
Pin the products
Drop a hotspot on each product in each photo. Popups pull live prices, variants and stock from your catalog — nothing is hand-typed.
Make the mobile version
Add a separate phone image per tile with the built-in crop, and place its hotspots independently so markers sit exactly on the products.
Add the block in the theme editor
Open the theme editor on your Lookbook page, create a template for it, then Add section → Apps → Hotspot Studio and select your section. Save.
Put it in the navigation
Online Store → Navigation → add “Lookbook” to the main menu. Next season, swap the photos in the app — the page and menu never change.
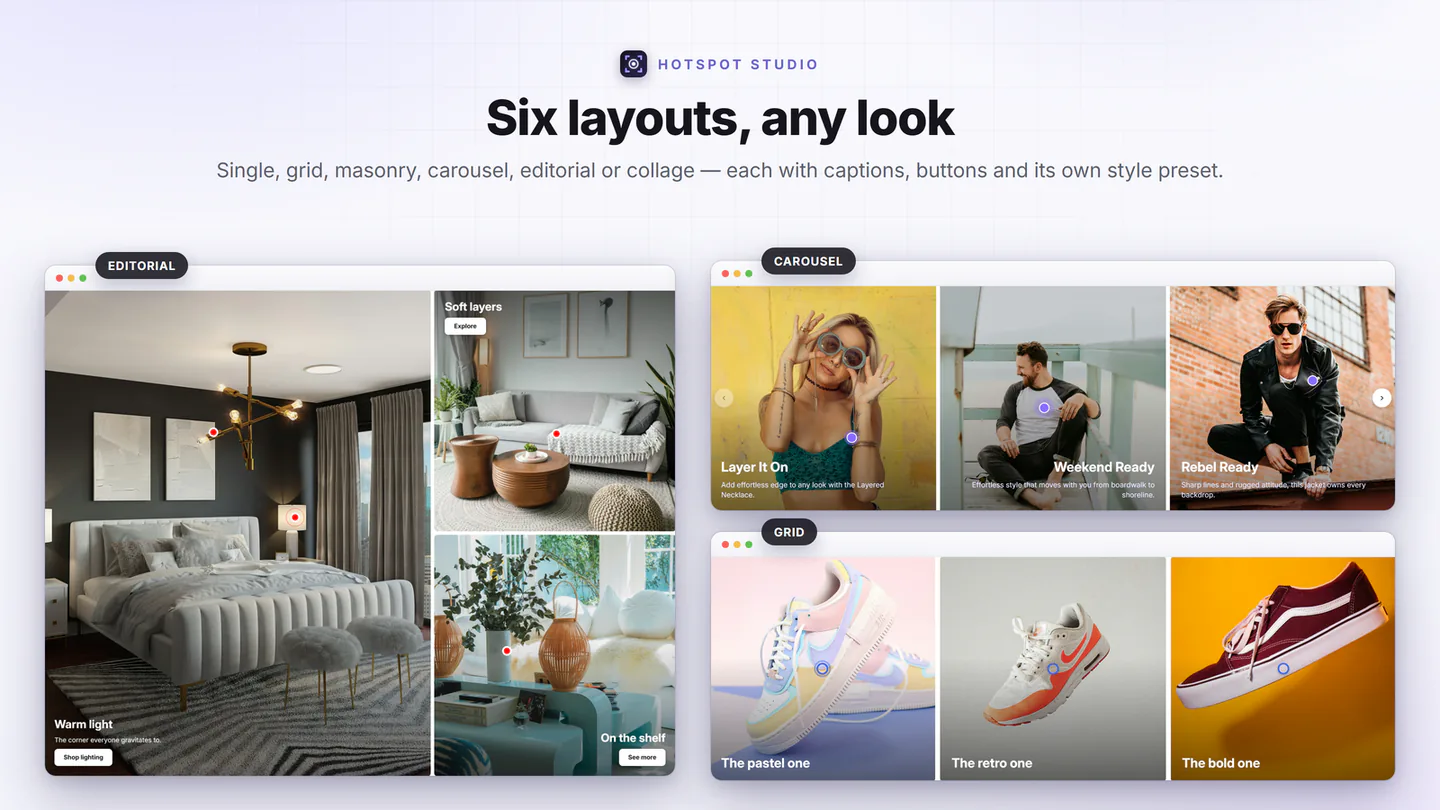
Pick the layout by your photography, not by taste
A lookbook lives or dies by how the page carries a whole season of photos. Three of the six layouts do most of the lookbook work:
- Grid — the workhorse when your shots share one aspect ratio: calm rows, equal weight, easy scanning.
- Masonry — for mixed portrait and landscape frames; nothing gets cropped to fit, the page reads like an editorial wall.
- Editorial — one lead campaign shot with supporting frames, magazine-style; strongest when the season has a hero image.
- Every tile stays a full hotspot canvas — captions, per-image backgrounds and inner shadows included, whichever layout you pick.
Sell the photo, not just the products in it
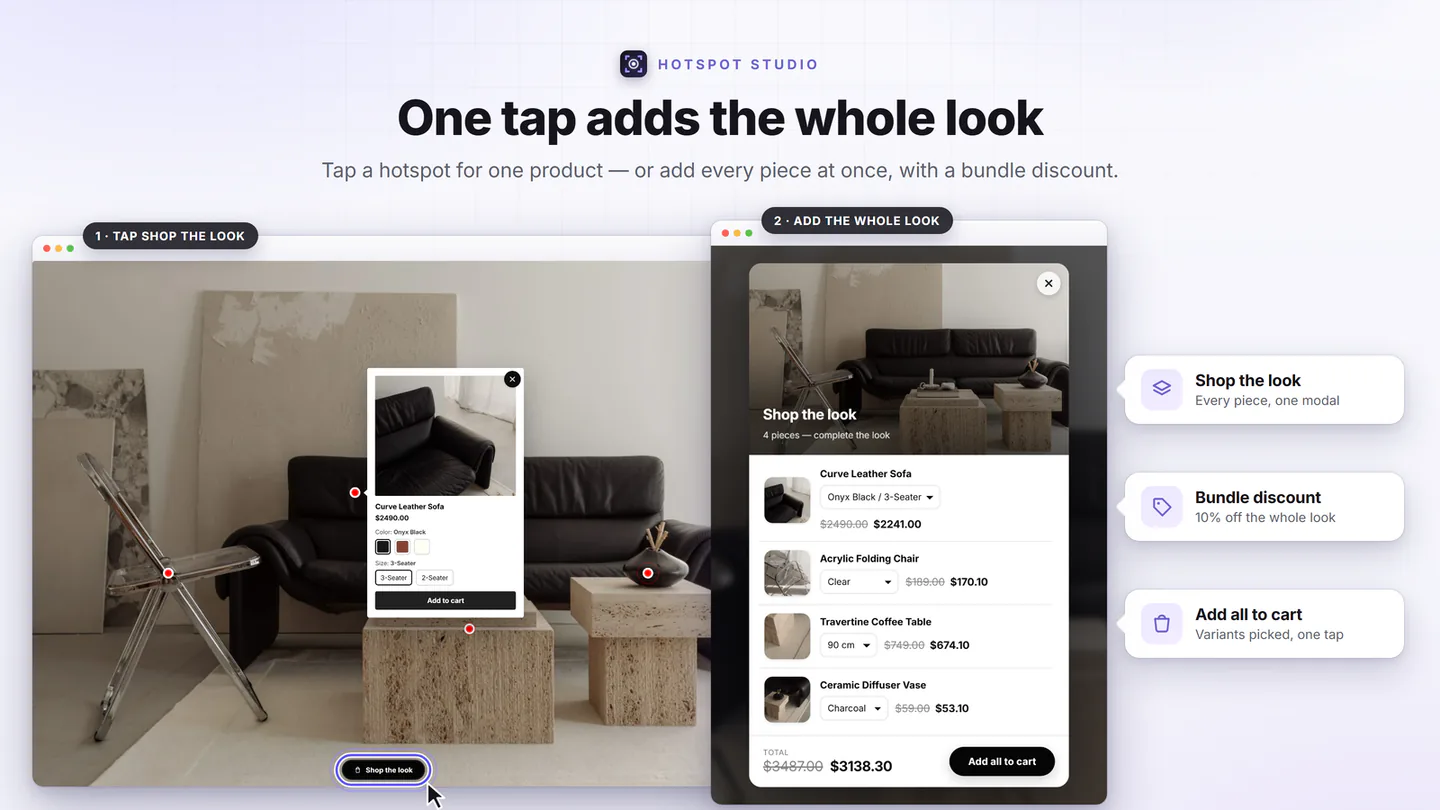
The shopper who stops on a lookbook photo wants that composition. Make the whole of it buyable in one motion.
- Shop the Look — one tap opens a picker with every pinned product: variants, per-item prices, and one button that adds the entire look to the cart.
- Set discounts that behave — an optional automatic discount applies only to items added from the look, so site-wide margins stay untouched.
- Honest stock states — sold-out items show a disabled button with your label instead of a CTA that fails at the cart.
Plan next season’s shoot from revenue, not taste
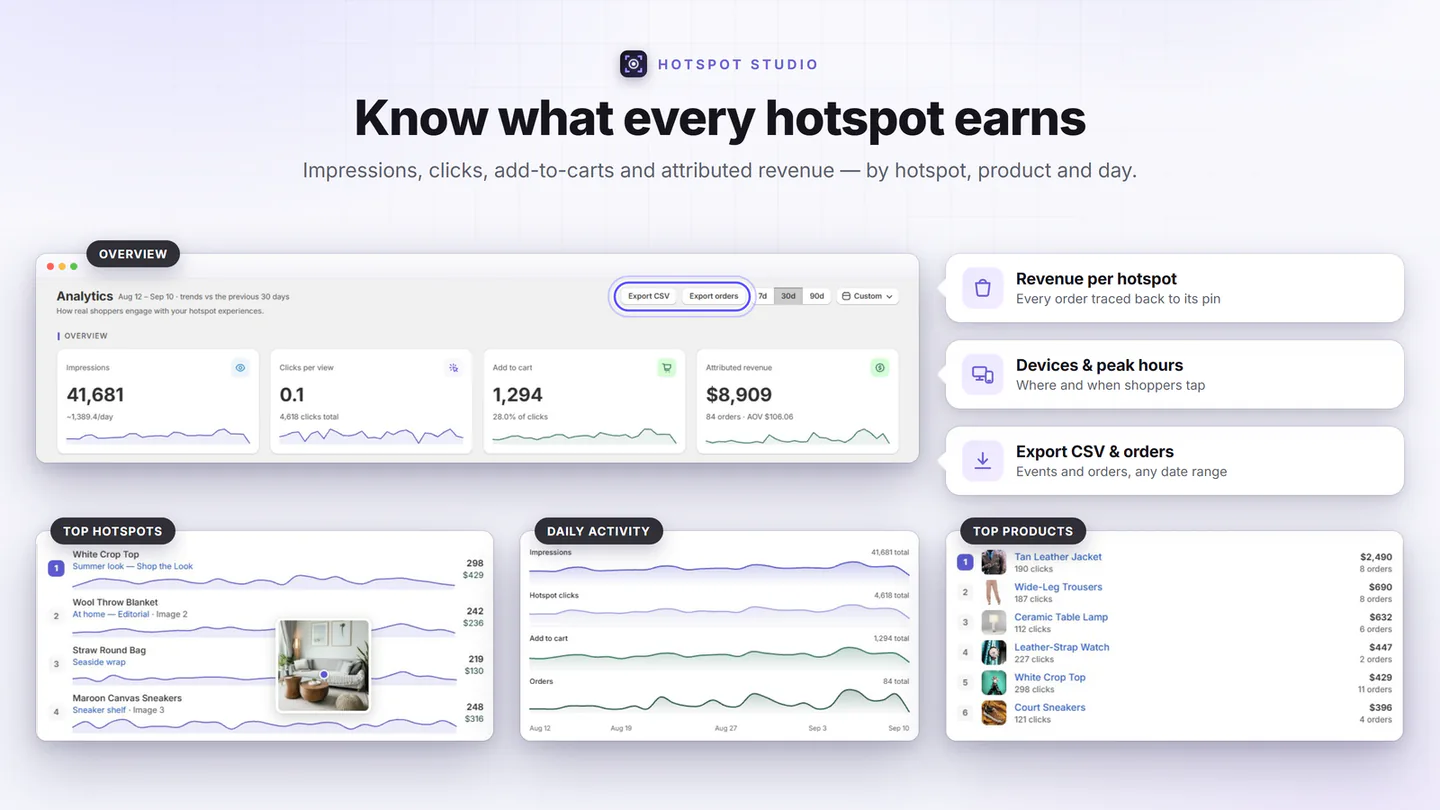
A lookbook is a recurring investment — photography, styling, retouching. The page should tell you what that investment returned.
- Revenue attribution — every add-to-cart made through the lookbook is tagged, so orders and revenue land on the exact image and hotspot that earned them.
- Refund-aware — returns are subtracted automatically; the numbers stay honest.
- Per-image leaderboard — see which frames sell and which just look good, and brief the next shoot accordingly.
One lookbook, four places it can work
The lookbook page
The classic destination — one URL for the season, linked from the main menu and campaign emails.
Product pages
Assign the lookbook to a whole collection and every product in it gets the gallery automatically — smart collections stay correct with zero syncing.
The home page
A shoppable hero or an editorial strip from the same section — your best campaign frame becomes a working entrance to the catalog.
Blog posts
Drop the same section into a “how to style it” article — editorial content that carries its own add-to-cart.
A season of photos can’t cost you the speed score
Shopify lookbook questions, answered
Does Shopify have a built-in lookbook feature?
No dedicated one. Themes ship image and collage sections, but they are static — no live prices, no variant pickers, no add to cart on the photo. A lookbook app block adds the shoppable layer to any Online Store 2.0 theme without touching theme code.
Can shoppers buy a whole look at once?
Yes. With Shop the Look enabled, one tap opens a picker with every product pinned in the photo — variants and per-item prices — and one button adds the whole outfit to the cart. An optional automatic discount applies only to items added from the look.
Which layout is best for a lookbook page?
Grid if your photos share one aspect ratio, Masonry if they come in mixed sizes, Editorial when one campaign shot should lead and the rest support it. All three keep every photo a full hotspot canvas.
Do I need to code or edit my theme?
No. The lookbook is a standard Online Store 2.0 app block added in the theme editor. Nothing is injected into your theme files, and uninstalling leaves no trace.
Will the lookbook work on phones?
Properly, yes — if the tool supports per-device media. Hotspot Studio takes a separate mobile image (or video) per tile with independent hotspot coordinates, so markers sit exactly on the products in the phone crop instead of drifting off a squeezed desktop shot.
How do I know whether the lookbook actually sells?
Measure revenue, not clicks. Hotspot Studio tags every add-to-cart made through the lookbook, so orders and revenue are attributed to the exact image and hotspot that earned them, with refunds subtracted automatically.
Shop the Look guide
The outfit-selling specifics: one-click looks, set discounts that only apply from the image, and the conversion checklist.
Shoppable images guide
Hotspot anatomy, all six gallery layouts, placement and performance — the fundamentals behind every lookbook.
Best apps compared
An honest, fact-checked comparison of the shoppable-image and lookbook apps on the Shopify App Store.
This season’s photos are ready. Make them a lookbook that sells.
Free plan included, paid plans from $7.99/mo with a 7-day trial — publish your lookbook page today.